Introduction
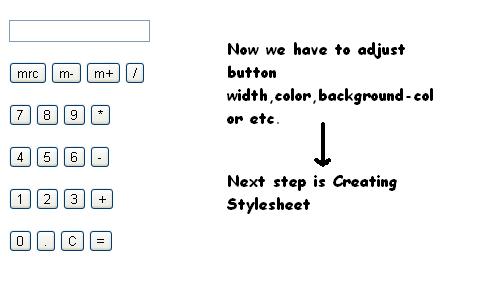
In this trick, we are going to create a calculator. We need to create a basic structure using HTML, style it using CSS and make it work using JavaScript.
Let's Start
Create an HTML Document
 Collapse | Copy Code
<div class="box">
<div class="display"><input type="text" readonly size="18" id="d"></div>
<div class="keys">
    <p><input type="button" class="button gray"
    value="mrc" onclick='c("Created....................")'>
    <input type="button" class="button gray"
    value="m-" onclick='c("...............by............")'>
    <input type="button" class="button gray" value="
    m+" onclick='c(".....................Anoop")'>
    <input type="button" class="button pink"
    value="/" onclick='v("/")'></p>
    <p><input type="button" class="button black"
    value="7" onclick='v("7")'><input type="button"
    class="button black" value="8" onclick='v("8")'>
    <input type="button" class="button black" value="9"
    onclick='v("9")'><input type="button"
    class="button pink" value="*" onclick='v("*")'></p>
    <p><input type="button" class="button black"
    value="4" onclick='v("4")'><input type="button"
    class="button black" value="5" onclick='v("5")'>
    <input type="button" class="button black" value="6"
    onclick='v("6")'><input type="button"
    class="button pink" value="-" onclick='v("-")'></p>
    <p><input type="button" class="button black"
    value="1" onclick='v("1")'><input type="button"
    class="button black" value="2" onclick='v("2")'>
    <input type="button" class="button black" value="3"
    onclick='v("3")'><input type="button"
    class="button pink" value="+" onclick='v("+")'></p>
    <p><input type="button" class="button black"
    value="0" onclick='v("0")'><input type="button"
    class="button black" value="." onclick='v(".")'>
    <input type="button" class="button black" value="C"
    onclick='c("")'><input type="button"
    class="button orange" value="=" onclick='e()'></p>
</div>
</div>
Here, I created the
div (
.box) which represent the structure of calculator. Inside it, I created two
div tags, one for display (inside this, I added
input type="text" to display the result and set this to read only) and one for Keys. Here, you see some
onclick event about which I will talk later.
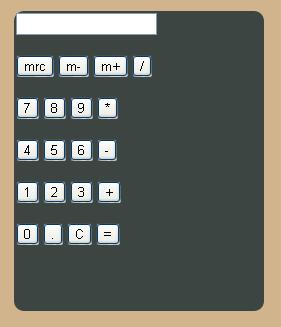
Preview (Using the Above Code Calculator looks like below)
Create CSS Stylesheet
Collapse | Copy Code
 body
{
background-color:tan;
}
.box
{
background-color:#3d4543;
height:300px;
width:250px;
border-radius:10px;
position:relative;
top:80px;
left:40%;
}
Here, I set background color for
body and set the
height,
width and
border radius of class box (
.box).
Preview
CSS
Collapse | Copy Code
.display
{
background-color:#222;
width:220px;
position:relative;
left:15px;
top:20px;
height:40px;
}
.display input
{
position:relative;
left:2px;
top:2px;
height:35px;
color:black;
background-color:#bccd95;
font-size:21px;
text-align:right;
}
Here, I set
.display background-color,
width,
height and
position. Inside it, we have an input box, I also adjust its
height,
width,
color,
background-color and
position.
Preview

CSS
Collapse | Copy Code
.keys
{
position:relative;
top:15px;
}
.button
{
width:40px;
height:30px;
border:none;
border-radius:8px;
margin-left:17px;
cursor:pointer;
border-top:2px solid transparent;
}
.button.gray
{
color:white;
background-color:#6f6f6f;
border-bottom:black 2px solid;
border-top:2px #6f6f6f solid;
}
.button.pink
{
color:black;
background-color:#ff4561;
border-bottom:black 2px solid;
}
.button.black
{
color:white;
background-color:303030;
border-bottom:black 2px solid;
border-top:2px 303030 solid;
}
.button.orange
{
color:black;
background-color:FF9933;
border-bottom:black 2px solid;
border-top:2px FF9933 solid;
}
.gray:active
{
border-top:black 2px solid;
border-bottom:2px #6f6f6f solid;
}
.pink:active
{
border-top:black 2px solid;
border-bottom:#ff4561 2px solid;
}
.black:active
{
border-top:black 2px solid;
border-bottom:#303030 2px solid;
}
.orange:active
{
border-top:black 2px solid;
border-bottom:FF9933 2px solid;
}
p
{
line-height:10px;
}
Here, I adjust
position of
div (
.keys). I use Double Class Selector( example:
class=button gray). By the use of this, I set
.button width,
height,
border-radius,
cursor, etc. This helps me in making all my buttons of the same
width,
height, etc. Then I set
.button.gray color,
background-color, etc.
After that, I create
:active (The
:active pseudo selector will match when an element is being pressed down on by the mouse Cursor.) for buttons. The thing I have done here is to change the top border color to black and bottom color to same as button color. This gives button feel of pressing down.
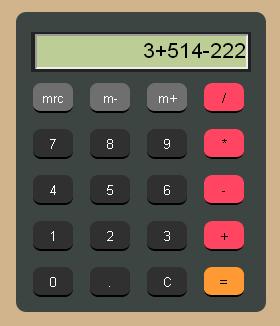
Preview

Finally, we have created a
Calculator but it does not work. Now we have to do scripting for it (using JavaScript).
Create Script (Using JavaScript)
Collapse | Copy Code
function c(val)
{
document.getElementById("d").value=val;
}
function v(val)
{
document.getElementById("d").value+=val;
}
function e()
{
try
{
  c(eval(document.getElementById("d").value))
}
catch(e)
{
  c('Error')
}
}
Here, I have created three functions. Function
c(val) is used for clearing the data from the display. When we click on "
C" button, then
onclick='c("")' event runs and searches for
c(val) function and displays the value according to the parameter passed inside it (here, we have not passed any parameter so the input screen appears blank or clear).
Function
v(val) is used for typing numbers as well as mathematical operators.
Function
e() is used for evaluating, i.e., on clicking "
=" button, value inside the
Id="d" is solved.
You can also download the source file for viewing.
Final Preview (Tried and Tested in Chrome)
That's all. Hope you like it.
Thanks!
By
Anoop Kr Sharma,
4 Aug 2013